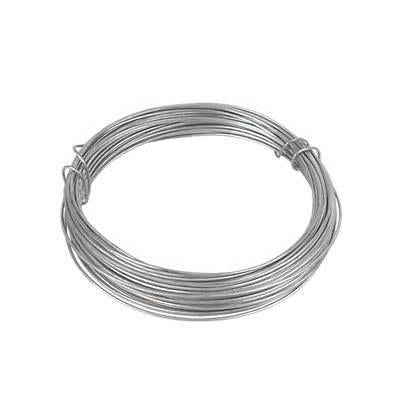
The “Tin Lead Soldering Iron Wire” is a product intended for various soldering tasks, suitable for both DIY projects and professional applications. It consists of a spool of…
£0.72
- Tin lead soldering iron wire designed for DIY projects
- Suitable for both home and outdoor use
- Wire length is 20 meters
- Prices are listed per individual unit
- Colors and designs may differ from the photos
- Size measurements are approximate
- Product availability is subject to stock levels
Description
How to Use Tin Lead Soldering Iron Wire
Materials Needed
- Tin Lead Soldering Iron Wire
- Soldering Iron
- Flux (optional, but recommended)
- Soldering Stand or Holder
- Soldering Mat or Heat Resistant Surface
- Protective Gear (Gloves, Safety Glasses)
Preparation
- Place the soldering mat on your work surface to protect it from heat.
- Set up your soldering iron on the soldering stand or holder for safety.
- If you are using flux, apply a small amount to the area where you will be soldering.
- Unroll a small section of the tin lead soldering wire from the spool. You will use this to melt and join components.
- Put on your protective gear to safeguard against accidental burns and fumes.
Heating the Soldering Iron
- Plug in the soldering iron and turn it on.
- Allow the soldering iron to heat up. This usually takes a few minutes. Check the manufacturer’s instructions for the recommended temperature.
Soldering Process
- Once the soldering iron is hot, touch the tip to the area where you want to apply solder for a couple of seconds to heat it.
- Bring the soldering wire to the heated area and touch it with the soldering iron tip. The heat will melt the solder wire.
- Allow the melted solder to flow and coat the joint evenly. Move the solder wire and soldering iron together to achieve a uniform distribution.
- Remove the soldering iron and the wire once you have applied enough solder. Ensure the joint cools and solidifies without disturbance.
Finishing Up
- Turn off and unplug the soldering iron. Allow it to cool down completely before storing.
- Inspect the solder joint to ensure a strong connection. It should be shiny and smooth.
- Clean any excess flux residue from the soldered area using an appropriate cleaner if necessary.
Safety Tips
- Always work in a well-ventilated area to avoid inhaling fumes.
- Never leave a hot soldering iron unattended.
- Keep the soldering iron away from flammable materials.
- Wash your hands after handling solder, especially if it contains lead.
Shipping Countries: United Kingdom (UK)
Ready to ship in 3-5 business days
Shipping Policy
Orders over £50 FREE Shipping
International orders, please contact us by email before lacing orders.
Refund Policy
Refund policy
Non-faulty items must be returned within 14 Days. We reserve the right to charge a restocking fee of 50% if we agree to unused & unopened returns. All items & packaging will be inspected, we do not pay for or contribute towards postage or shipping fees, you must used tracked services as we do not accept untracked.
Returns on smoking and e-cigarette items are not accepted.
We operate a 5% margin for broken or faulty goods.
The risk of damage to or loss of the goods passes to you at the time of delivery or the time we attempt delivery. This is when the goods are collected if you fail to take delivery at the agreed time.
Other than implied warranties and guarantees under the law, business-to-business sales are not covered by warranties or guarantees.
Orders are despatched by pallet or by box for smaller deliveries. In the event that the pallet or wrapping shows any signs of damage, please notify us immediately by emailing help@m8w.co.uk and noting it on the delivery manifest. If the order is below £750 + VAT and not sent on a pallet, we do not take any responsibility for damages or issues with any products including liquids, glass etc.
Once the goods leave our warehouse with our chosen carrier, it is your responsibility to inquire if you require insurance. The goods are not insured by default, so it is important to discuss this with us prior to placing your order so that we can get a quote for you for the premium to cover the value of the goods. If there is any evidence of damage during transit, the delivery note should be noted and reported immediately to customer services. Never accept delivery if there is evidence of significant damage.
Our customer service team must be notified within 72 hours of any shortages or damages above 5%. In the event that this timeframe does not apply, all claims will be deemed waived and completely barred.
We charge an administration/picking/packing fee of 25% of the order value plus any delivery charges incurred for cancelled or refunded orders. Refunds are not available for any deposits paid.
The cost of returning damaged or faulty items to us for inspection must be borne by you. Returning items is your responsibility, including handling and shipping.
Once we receive damaged returned goods, we will inspect them and determine whether or not liability can be accepted. We will notify you as soon as the outcome is known.
There will be no liability beyond the value of the goods.
Opened and non-originally packaged goods will not be accepted for return.
Please also refer to our Terms & Conditions page for further information and policies.
4 reviews for The “Tin Lead Soldering Iron Wire” is a product intended for various soldering tasks, suitable for both DIY projects and professional applications. It consists of a spool of…
Vendor Information
- Store Name: TK Wholesaler
- Vendor: TK Wholesaler
- No ratings found yet!
Product Location
UB8 9PZ, Uxbridge, Greater London, England, United Kingdom-
**Space Efficiency**: Often designed to be compact and foldable, making it easy to store when not in use
£13.15 Add to basket -
Product
£2.37 Add to basket -
**Brand/Model**: PB Botanica
£6.59 Add to basket -
The Adjustable Extendable Fridge Organiser Storage Rack is a versatile kitchen accessory designed to help you optimize space and keep your refrigerator organized. This pull-out…
£1.09 Add to basket -
If you need more specific information or details about purchasing, you might want to check with the retailer or manufacturer offering this product
£0.94 Add to basket -
It sounds like you’re referring to a crafting or DIY kit for making glasses with designs inspired by dragonflies and dolphins. The “P2540” might be a model or product number,…
£0.76 Add to basket







Rahila (verified owner) –
I couldn’t be happier with this wholesaler. The customer service is outstanding, and the products I received are of excellent quality. Highly recommended!
Abdullah (verified owner) –
Great wholesaler with amazing products. I received exactly what I ordered, and the customer support team was very responsive.
Duriya (verified owner) –
I always look forward to shopping with this wholesaler. The products are fantastic, and I know I’ll receive them quickly every time.
Steven (verified owner) –
I always get exactly what I order. The quality is always top-notch, and the shipping is super fast. I’ll be buying again!