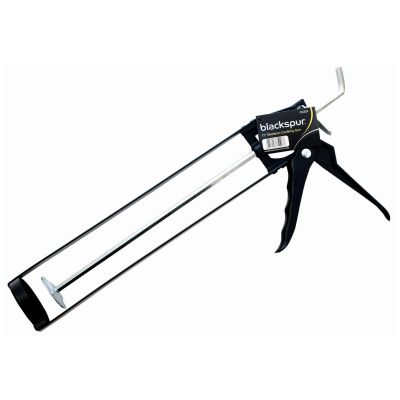
BLACKSPUR 11-INCH SKELETON CAULKING TOOL
£1.64
Last updated on September 26, 2025 5:26 am Details
Report Abuse
Description
How to Use the Blackspur 11 Inch Skeleton Caulking Gun
Step 1: Gather Your Materials
- Blackspur 11 Inch Skeleton Caulking Gun
- Caulk or sealant tube
- Utility knife or scissors
- Damp cloth or sponge
- Protective gloves (optional)
Step 2: Prepare the Caulk Tube
- Remove the caulk tube from its packaging.
- Use a utility knife or scissors to cut the tip of the nozzle at a 45-degree angle. The size of the opening should match the width of the gap you are filling.
- Insert a long, thin object into the nozzle to break the seal inside the tube.
Step 3: Load the Caulking Gun
- Pull the plunger rod on the caulking gun all the way back.
- Insert the caulk tube into the gun, ensuring the nozzle is facing away from the trigger.
- Push the plunger rod forward until it is snug against the back of the caulk tube.
Step 4: Apply the Caulk
- Position the nozzle at the start of the gap or joint you wish to fill.
- Squeeze the trigger gently to start the flow of caulk.
- Move the gun steadily along the gap, maintaining consistent pressure for an even bead of caulk.
- Release the trigger to stop the flow as needed.
Step 5: Finish the Application
- Use a damp cloth or sponge to smooth and shape the caulk bead, pressing it into the joint for better adhesion.
- Wipe away any excess caulk immediately to prevent it from drying.
Step 6: Clean Up
- Release the pressure on the caulk tube by pressing the release lever on the back of the caulking gun.
- Remove the caulk tube from the gun if it is not empty and store it properly.
- Wipe down the caulking gun with a damp cloth to remove any residual caulk.
Tips and Warnings
- Practice on a scrap piece of material to get a feel for the flow of caulk before applying it to your project.
- Wear protective gloves if you are sensitive to sealant materials.
- Ensure the area is well-ventilated when using caulk products.
5 reviews for BLACKSPUR 11-INCH SKELETON CAULKING TOOL
Loading...
Vendor Information
- Store Name: Good Office Supplies
- Vendor: Good Office Supplies
- No ratings found yet!
Product Location
32 The Broadway, Ealing, Greenford, UB6 9PT, United Kingdom-
12oz Biodegradable Bowls (335ml) Made from Natural Leaf Bagasse – Pack of 50
£2.08 Add to basket -
Neutradol Sniff ‘n’ Purr Carpet Deodorizer for Pets 525g
£1.09 Read more -
Chef Aid 33cm x 21.5cm x 1.5cm Baking Tray
£1.97 Add to basket -
PRIMA Sewing Elastic Assorted Sizes 6-Pack
£0.65 Add to basket -
TALA Pack of 10 Disposable Icing Bags
£0.97 Add to basket -
Rentokil Rodent Control Pasta Bait – 5 Sachets
£3.51 Add to basket





Jubair (verified owner) –
The customer service from this wholesaler is outstanding, and the product quality is second to none. I will definitely be back for future orders.
Faiza (verified owner) –
Perfect purchase experience. The product arrived exactly as expected, and I can’t say enough about the excellent customer support.
Raheel (verified owner) –
I’m very impressed with this wholesaler. The products were fantastic, and the shipping was quicker than expected.
Irfan (verified owner) –
Excellent wholesaler! The quality is always top-notch, and shipping is fast. I’ve been a repeat customer for months, and I’ll keep coming back.
Clara (verified owner) –
I’ve had multiple orders from this wholesaler, and each time, I’ve been impressed. The products are high-quality, and their customer service is excellent.