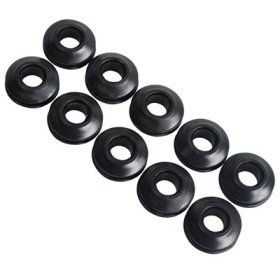
AMTECH 10-PACK TARPAULIN REPAIR EYELET KIT
£0.98
Last updated on July 27, 2025 6:39 am Details
Report Abuse
Description
How to Use the AMTECH 10 Tarpaulin Repair Eyelet Set
Contents
- 10 Durable Plastic Eyelets
- Instructions on the Back of the Package
Tools Needed
- Hammer
- Pencil or Marker
- Scissors or Craft Knife
Instructions
Step 1: Mark the Spot
- Identify the area on the tarpaulin where you need to add or replace an eyelet.
- Use a pencil or marker to mark the exact spot.
Step 2: Prepare the Hole
- Using scissors or a craft knife, carefully cut out a small hole at the marked spot.
- Ensure the hole is slightly smaller than the diameter of the eyelet.
Step 3: Insert the Eyelet
- Take one half of the eyelet and push it through the hole from the underside of the tarpaulin.
- Place the corresponding top half of the eyelet over the protruding underside part.
Step 4: Secure the Eyelet
- Position the eyelet on a hard surface.
- Gently tap the eyelet with a hammer until the top and bottom pieces are securely fastened together.
Step 5: Check the Installation
- Ensure that the eyelet is firmly in place and does not move.
- If necessary, gently tighten further with additional hammer taps.
Tips
- Be cautious when using sharp tools to avoid injury.
- Double-check measurements before making any cuts.
- Practice on a scrap piece of material if you are unfamiliar with the process.
5 reviews for AMTECH 10-PACK TARPAULIN REPAIR EYELET KIT
Loading...
Vendor Information
- Store Name: Good Office Supplies
- Vendor: Good Office Supplies
- No ratings found yet!
Product Location
32 The Broadway, Ealing, Greenford, UB6 9PT, United Kingdom-
KANLUX RAPID MAXX 12W LED E27 BULB 1050LM – NATURAL WHITE
£1.10 Add to basket -
31CM Round Large Barbecue Grill
£3.29 Add to basket -
CHEF AID 12-CUP SHALLOW MUFFIN PAN
£2.19 Add to basket -
151 Super Glue 1g, Pack of 5
£0.86 Add to basket -
Elite Extra Strong Black Trash Bags / Bin Liners Pack of 10
£0.87 Add to basket -
Grey Rubber Door Wedge
£0.74 Add to basket




Maahnoor (verified owner) –
This wholesaler’s products are always high-quality, and I appreciate their attention to detail when it comes to packaging and shipping.
Urshia (verified owner) –
Such a reliable wholesaler! The products are always top-tier, and shipping is quick and hassle-free. I highly recommend this company!
Amaan (verified owner) –
I’m always amazed by the quality of the products and the speed of delivery. This wholesaler is a reliable source for my business.
Morad (verified owner) –
Wonderful products, great service, and timely delivery. I’ll definitely continue shopping here for my business needs.
Fariha (verified owner) –
I’ve made several purchases from this wholesaler and have always been satisfied. The products are great quality, and shipping is fast.