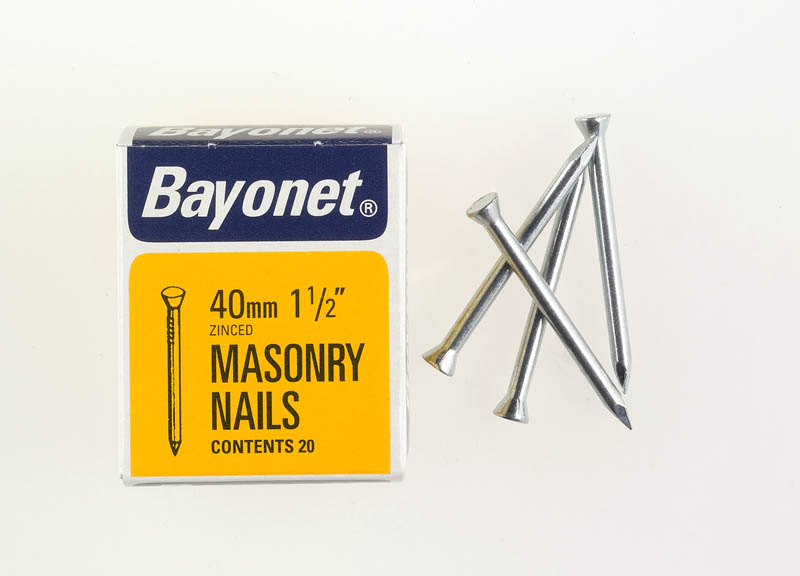
40mm Zinc Plated Bayonet Masonry Nails, Pack of 36
£1.38
Last updated on September 12, 2025 6:07 am Details
Report Abuse

Description
How to Use Bayonet Zinc Plated Masonry Nails
What You Will Need
- Bayonet Zinc Plated Masonry Nails (40mm)
- Hammer
- Drill (optional for hard surfaces)
- Protective eyewear
- Measuring tape
- Pencil or marker
Steps to Follow
Step 1: Safety First
- Put on protective eyewear to safeguard your eyes from any debris.
- Ensure your workspace is clear and well-lit.
Step 2: Marking the Spot
- Use a measuring tape to determine where you need to place the masonry nail.
- Mark the spot with a pencil or marker for precision.
Step 3: Preparing the Surface
- If the surface is particularly hard, consider using a drill to make a small pilot hole.
- Ensure the pilot hole is smaller than the nail to maintain a tight fit.
Step 4: Hammering the Nail
- Position the masonry nail on the marked spot or pilot hole.
- Hold the nail steady and begin tapping it gently with the hammer to set it in place.
- Continue hammering until the nail is securely in the wall, ensuring it is straight.
Step 5: Finishing Up
- Check the stability of the nail to ensure it is firmly in place.
- Clean up any dust or debris from the workspace.
Tips for Best Results
- Use the correct size and type of nail for the surface you are working with.
- Avoid hammering too forcefully to prevent bending the nail or damaging the surface.
4 reviews for 40mm Zinc Plated Bayonet Masonry Nails, Pack of 36
Loading...
Vendor Information
- Store Name: Good Office Supplies
- Vendor: Good Office Supplies
- No ratings found yet!
Product Location
32 The Broadway, Ealing, Greenford, UB6 9PT, United Kingdom-

HYDI Large Vinyl Gloves, Powder-Free, Pack of 100
£1.93 Add to basket -
APOLLO 6-PACK TOAST CORK COASTERS, 11CM
£3.62 Add to basket -
140ML Platinum Deluxe Leather Lotion in Cherry Blossom
£2.85 Add to basket -
Set of 6 Pink Glitz Balloons, 40 inches
£0.99 Read more -
24CM Falcon Enamel Dinner Plate
£2.85 Add to basket -
Rentokil 500ml Woodworm Treatment Solution
£7.47 Add to basket


Aleena (verified owner) –
I highly recommend this wholesaler! The quality of their products is excellent, and they always deliver on time. I’ve never been disappointed.
Stella (verified owner) –
I always enjoy my experience buying from this wholesaler. Their products are always exactly as described, and I always receive my orders quickly.
Christopher (verified owner) –
I’m very happy with the product quality. I’ve ordered a few times from this wholesaler, and I’ve always been satisfied with both the products and service.
Badr-al-Din (verified owner) –
Highly satisfied with the products I ordered. The wholesaler always provides great quality and reliable service. I will continue buying here.