
**Dimensions**: The sealer measures 9.2 x 5.2 cm, making it easy to store and transport. Its small size is ideal for kitchens with limited counter space or for taking on trips
£6.88
- Mini Food Vacuum Bag Sealer
- Comes with 6 bags included
- Rechargeable via Micro USB
- Dimensions: 9.2 x 5.2 cm
- Prices are listed per unit
- Colors and designs may vary from photos
- Sizes provided are approximate
- Availability is subject to stock levels
Last updated on October 25, 2025 8:30 pm Details
Report Abuse
Description
How to Use the Mini Food Vacuum Bag Sealer
Unboxing and Initial Setup
- Remove the Mini Food Vacuum Bag Sealer and accessories from the packaging.
- Ensure that you have the sealer, the included 6 bags, and a micro USB charging cable.
Charging the Device
- Connect the micro USB cable to the sealer.
- Plug the other end of the cable into a USB power source such as a wall adapter, computer, or power bank.
- Allow the sealer to charge fully before first use. This may take a few hours.
- Once fully charged, disconnect the device from the power source.
Preparing the Bags
- Take one of the provided vacuum bags.
- Ensure the bag is clean and undamaged.
- Fill the bag with the food items you wish to store.
- Leave enough space at the top of the bag for sealing.
Sealing the Bag
- Place the open end of the bag into the sealer’s vacuum slot.
- Ensure the bag is properly aligned and free from wrinkles.
- Press the power button on the sealer to initiate the vacuum and sealing process.
- Wait for the sealer to finish; it may make a sound as it operates.
- Once completed, remove the bag from the sealer and check the seal.
Storing Sealed Bags
- Store the sealed bags in the refrigerator or freezer as needed.
- Label the bags with the contents and date of sealing for easy identification.
Maintaining the Sealer
- Clean the sealer regularly with a damp cloth to ensure it remains in good working condition.
- Do not submerge the device in water or use harsh chemicals.
- Recharge the device as needed to maintain optimal performance.
Shipping Countries: United Kingdom (UK)
Ready to ship in 3-5 business days
Shipping Policy
Orders over £50 FREE Shipping
International orders, please contact us by email before lacing orders.
Refund Policy
Refund policy
Non-faulty items must be returned within 14 Days. We reserve the right to charge a restocking fee of 50% if we agree to unused & unopened returns. All items & packaging will be inspected, we do not pay for or contribute towards postage or shipping fees, you must used tracked services as we do not accept untracked.
Returns on smoking and e-cigarette items are not accepted.
We operate a 5% margin for broken or faulty goods.
The risk of damage to or loss of the goods passes to you at the time of delivery or the time we attempt delivery. This is when the goods are collected if you fail to take delivery at the agreed time.
Other than implied warranties and guarantees under the law, business-to-business sales are not covered by warranties or guarantees.
Orders are despatched by pallet or by box for smaller deliveries. In the event that the pallet or wrapping shows any signs of damage, please notify us immediately by emailing help@m8w.co.uk and noting it on the delivery manifest. If the order is below £750 + VAT and not sent on a pallet, we do not take any responsibility for damages or issues with any products including liquids, glass etc.
Once the goods leave our warehouse with our chosen carrier, it is your responsibility to inquire if you require insurance. The goods are not insured by default, so it is important to discuss this with us prior to placing your order so that we can get a quote for you for the premium to cover the value of the goods. If there is any evidence of damage during transit, the delivery note should be noted and reported immediately to customer services. Never accept delivery if there is evidence of significant damage.
Our customer service team must be notified within 72 hours of any shortages or damages above 5%. In the event that this timeframe does not apply, all claims will be deemed waived and completely barred.
We charge an administration/picking/packing fee of 25% of the order value plus any delivery charges incurred for cancelled or refunded orders. Refunds are not available for any deposits paid.
The cost of returning damaged or faulty items to us for inspection must be borne by you. Returning items is your responsibility, including handling and shipping.
Once we receive damaged returned goods, we will inspect them and determine whether or not liability can be accepted. We will notify you as soon as the outcome is known.
There will be no liability beyond the value of the goods.
Opened and non-originally packaged goods will not be accepted for return.
Please also refer to our Terms & Conditions page for further information and policies.
Loading...
Vendor Information
- Store Name: TK Wholesaler
- Vendor: TK Wholesaler
- No ratings found yet!
Product Location
UB8 9PZ, Uxbridge, Greater London, England, United Kingdom-

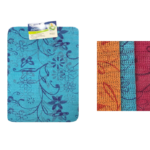
The PVC Non Slip Dining Placemat with Floral Print is a set of placemats designed for dining tables. Each placemat measures 30 x 40 cm and the pack includes two placemats…
£0.72 Add to basket -
This product appears to be a versatile net designed for various catching purposes. The net features a long handle, measuring 1.10 meters, which is ideal for reaching into…
£0.72 Add to basket -
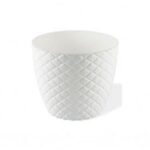
The “Diamond Cut Round Plant Pot No 3” is a decorative plant pot with dimensions of 18 x 16 cm. It features a diamond-cut design, giving it a stylish and textured appearance….
£3.03 Add to basket -
The “Large Plastic Mirror Sticker 30 x 40 cm Assorted Designs 7551” appears to be a decorative product that can be used to add a reflective surface to various areas in your home…
£0.94 Add to basket -
It seems like you are referring to a poster of the Queen of England in A2 size, which measures 59cm x 42cm. The “PO1 (Parcel Rate)” likely indicates a specific shipping or…
£0.99 Add to basket -
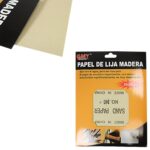
**DIY Abrasive Sanding Paper Pack (28 x 23 cm, Pack of 6)**
£0.83 Add to basket


Reviews
There are no reviews yet.