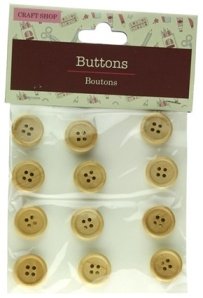
Traditional Round Wooden Buttons with 4 Holes
£0.77
Last updated on December 26, 2025 2:16 am Details
Report Abuse
Description
How to Use Traditional Wooden Round 4-Hole Buttons
Materials Needed
- Traditional Wooden Round 4-Hole Buttons
- Needle
- Thread (matching or contrasting color)
- Scissors
- Fabric or item to attach buttons to
Step-by-Step Instructions
Step 1: Select Your Button Size
Choose the size of the button that best suits your project. Consider the thickness and type of fabric you are working with.
Step 2: Prepare Your Needle and Thread
- Cut a length of thread that is comfortable to work with, typically around 20-24 inches.
- Thread the needle and tie a knot at the end of the thread.
Step 3: Position the Button
- Place the button on the fabric where you want it to be sewn.
- Ensure it aligns with any corresponding buttonholes if applicable.
Step 4: Sew the Button
- Start from the backside of the fabric, push the needle up through one of the holes in the button.
- Guide the needle down through the diagonal hole and pull the thread tight.
- Repeat this process several times to secure the button, alternating holes to create an “X” pattern.
Step 5: Secure the Thread
- Once the button feels securely attached, bring the needle to the backside of the fabric.
- Tie a knot close to the fabric to secure the thread.
- Trim any excess thread with scissors.
Additional Uses
- Incorporate buttons into jewelry-making projects for a unique look.
- Use them in various sewing crafts to add a natural and individual touch.
Enjoy adding these natural wooden buttons to your creative projects!
4 reviews for Traditional Round Wooden Buttons with 4 Holes
Loading...
Vendor Information
- Store Name: Good Office Supplies
- Vendor: Good Office Supplies
- No ratings found yet!
Product Location
32 The Broadway, Ealing, Greenford, UB6 9PT, United Kingdom-
PET TOUCH BITE ME BONE SQUEAKY DOG TOY
£0.87 Add to basket -
Set of 6 Black Glitter Balloons, 18 Inches
£1.00 Read more -
RENTOKIL RAT POISON GRAIN BAIT PACK – 3 SACHETS
£4.39 Add to basket -
Rapesco Marlin Black Full Strip Stapler, 25-Sheet Capacity
£2.74 Add to basket -
2-Liter Hot Water Bottle
£1.71 Add to basket -
Hobby Yummy Ice Cube Tray with Soft Base in Various Colors
£1.09 Add to basket


Phoenix (verified owner) –
I’ve been buying from this wholesaler for months, and I couldn’t be happier. The product quality is always spot on, and the delivery is always timely.
Joseph (verified owner) –
I always choose this wholesaler for my supplies. The quality of the products is outstanding, and their service is always reliable.
Humaid (verified owner) –
Amazing quality! This wholesaler provides the best products at great prices, and their shipping is always quick.
Zoya (verified owner) –
The product quality exceeded my expectatios! I will definitely be ordering from this wholesaler again. The service was also exceptional.